How to Deploy VPN Gateway in Azure: Step-by-Step Guide (2026)
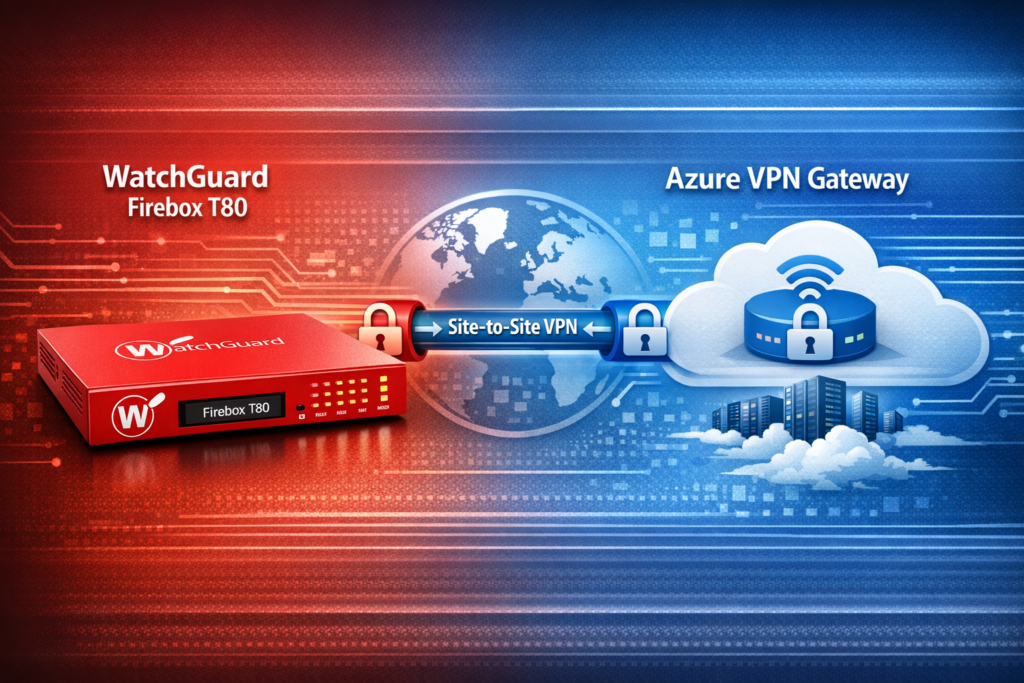
If you want to connect your on-premises network to Microsoft Azure securely, deploying a VPN Gateway is the first and most important step. In this guide, I will show you exactly how to create a Route-based VPN Gateway in Azure, which is recommended for Site-to-Site VPN connections (like with WatchGuard Firebox).
This tutorial is perfect for beginners and IT professionals who need a reliable hybrid connection between their local office and Azure cloud.
Why Do You Need an Azure VPN Gateway?
An Azure VPN Gateway acts as a bridge between your on-premises network and your Azure Virtual Network (VNet). It allows secure encrypted traffic using IPsec/IKE protocols. It is commonly used for:
- Site-to-Site VPN (S2S)
- Point-to-Site VPN (P2S)
- Connecting multiple branch offices to Azure
Note: We will create a Route-based VPN Gateway because it supports IKEv2 and works better with modern firewalls like WatchGuard.
Prerequisites
Before starting, make sure you have:
- An active Azure subscription
- A Virtual Network (VNet) already created
- Enough IP address space to create a GatewaySubnet (minimum /27 recommended, e.g., 10.0.255.0/27)
- Administrative access to the Azure Portal
Step 1: Create GatewaySubnet in Your Virtual Network
The GatewaySubnet is a special subnet required for the VPN Gateway.
- Log in to the Azure Portal.
- Go to Virtual Networks and select your VNet.
- In the left menu, click Subnets + Gateway subnet.
- Enter the following:
- Name: GatewaySubnet (this name is mandatory)
- Subnet address range: Choose a small CIDR block that doesn’t overlap with other subnets (example: 10.10.255.0/27)
- Click Save.
Tip: Do not use a smaller subnet than /27, as Azure may reject it.
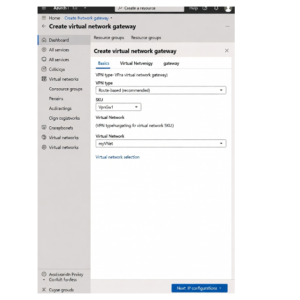
Step 2: Deploy the VPN Gateway
-
In the Azure Portal search bar, type Virtual network gateway and select it.
-
Click + Create.
-
On the Basics tab, fill in these details:
- Subscription: Select your subscription
- Resource group: Choose or create one
- Name: Give your gateway a name (e.g., vpngw-watchguard)
- Region: Must match the region of your Virtual Network
- Gateway type: VPN
- VPN type: Route-based (recommended)
- SKU: Start with VpnGw1 or Basic for testing (you can resize later)
- Generation: Generation 1 or 2 depending on SKU
- Virtual network: Select your existing VNet
- Gateway subnet address range: It should auto-detect if already created
- Public IP address: Create new (or use existing)
-
Click Review + create → Create.
Important: Deploying the VPN Gateway can take 20 to 45 minutes. You will see the status as “Creating” during this time.

Step 3: Verify the VPN Gateway Deployment
Once deployment is complete:
- Go to your newly created VPN Gateway resource.
- In the Overview page, note down the Public IP address — you will need this for your on-premises firewall configuration (e.g., WatchGuard Firebox).
- Check the status — it should show Succeeded.


Step 4: (Optional but Recommended) Configure IPsec/IKE Policy
For better compatibility with devices like WatchGuard Firebox T80:
- Go to your VPN Gateway → Connections (you will create this later)
- When adding a connection, enable Custom IPsec/IKE policy
- Recommended settings:
- IKE Phase 1: AES256, SHA256, DH Group 14
- IPsec Phase 2: AES256, SHA256, PFS Group 14
Best Practices for Azure VPN Gateway
- Always use Route-based VPN type for modern setups.
- Start with a smaller SKU (VpnGw1) for testing, then scale up as needed.
- Enable Active-Active mode if you need high availability.
- Monitor costs — VPN Gateways are charged hourly + data transfer.
- Never delete the GatewaySubnet while the gateway exists.
Common Issues and Fixes
- Gateway deployment fails: Check if GatewaySubnet exists and has enough IP addresses.
- Takes too long: This is normal — wait at least 30-45 minutes.
- Cannot select VNet: Make sure the gateway region matches the VNet region.
Next Step: Connect to On-Premises Firewall
After the VPN Gateway is deployed, the next step is to create a Local Network Gateway and a Connection to link it with your WatchGuard Firebox T80 or any other on-premises device.
You can follow my previous guide: Site-to-Site VPN: WatchGuard Firebox T80 ↔ Azure VPN Gateway Configuration Guide