
Veeam Backup Repository is one of the most important components in Veeam Backup & Replication. It is the central storage location where all your virtual machine backups, replication copies, backup chains, and metadata are stored. This detailed guide explains everything based on the screenshots you provided — from the main dashboard to the complete wizard configuration.
Microsoft-hyper-v-veeam-backup-replication-user-guide
Veeam Backup Repository Setup and Configuration:Walkthrough Guide
the Backup Infrastructure > Backup Repositories section in the Veeam console. This is the main management dashboard where you can view all configured repositories.
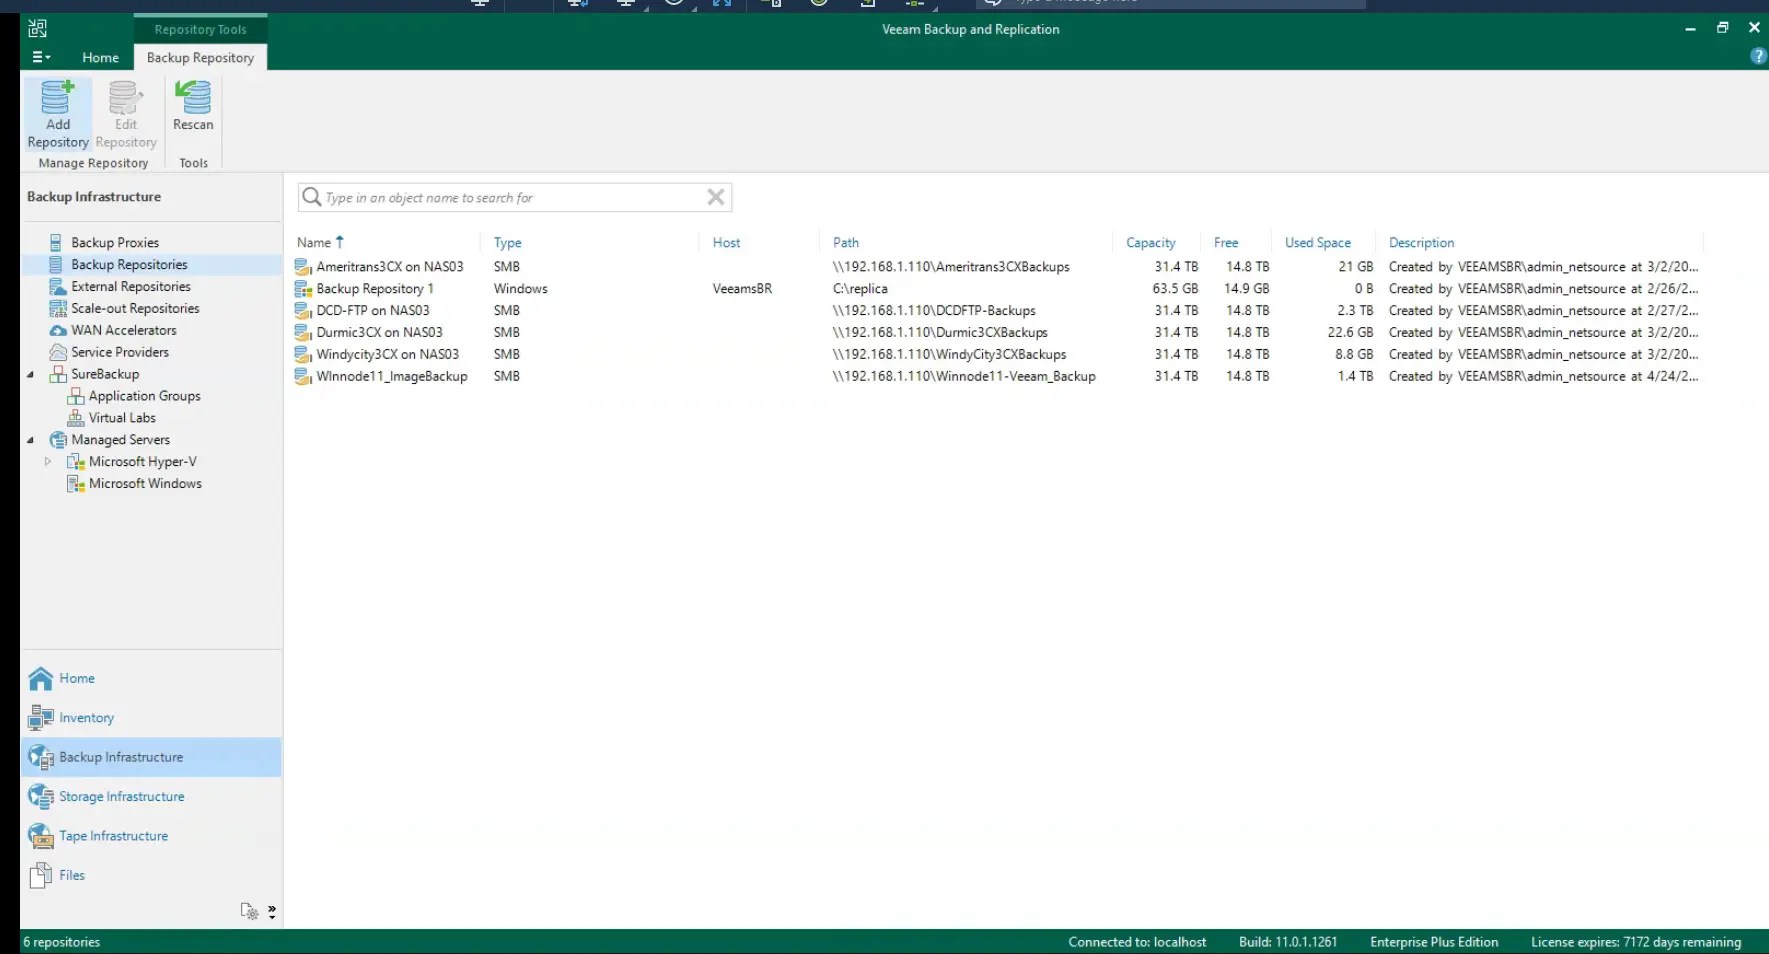
Key Columns Explained:
- Name: Unique name of the repository (e.g., Durmic3CX on NAS03)
- Type: Storage type — SMB, Windows, Linux, etc.
- Host: Server or NAS where the repository is hosted
- Path: Actual storage location (UNC path)
- Capacity / Free / Used Space: Storage utilization details
- Description: Auto-generated information with creation date
From this dashboard, you can easily monitor storage usage, add new repositories, edit existing ones, or perform a Rescan. It gives administrators full visibility and control over where backups are being stored.
Name Section Explained
This is the first step of the Edit Backup Repository wizard.
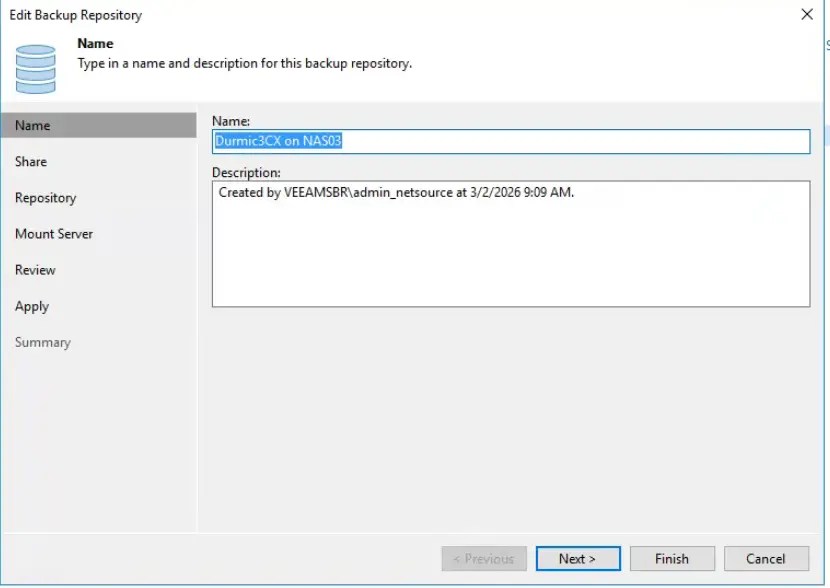
- Name: Enter a clear, meaningful name such as “Durmic3CX on NAS03”, “Production-Repo-01”, or “Offsite-NAS-Repo”.
- Description: Optional field. Veeam automatically adds creation details (e.g., “Created by VEEAMSRBadmin_netsource at 3/2/2026”).
Best Practice: Use descriptive names that include workload, location, or storage type so they are easy to identify later.
Share Section – UNC Path & Credentials
In the Share step, you configure the network share:
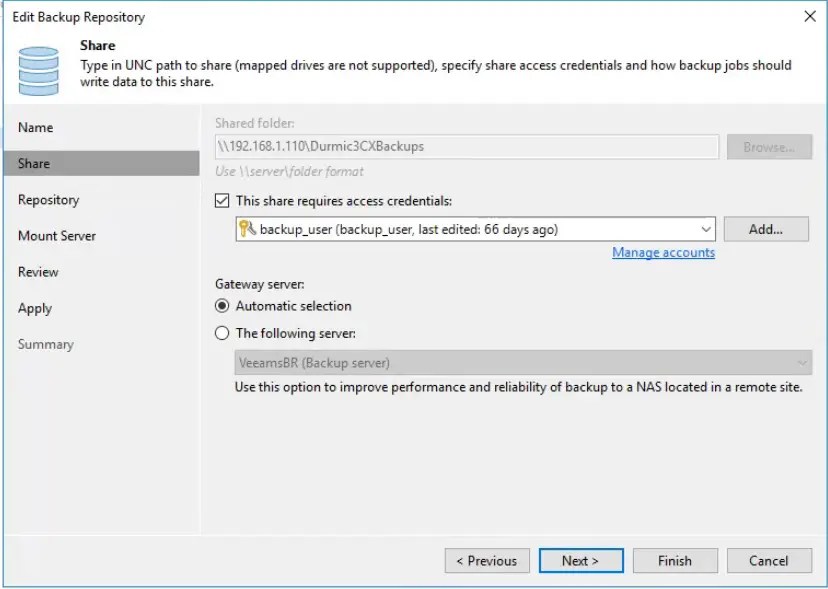
- Shared folder: Enter the UNC path (e.g., 192.168.1.110Durmic3CXBackups)
- This share requires access credentials: Select or add a user account (e.g., backup_user) that has full read/write permissions on the share.
- Gateway Server: Choose Automatic selection or a specific server (VeeamsBR). Using a gateway server improves performance when the NAS is in a remote location.
Important Note: Mapped drives are not supported. Always use UNC paths (servershare).
Repository Settings – Path & Load Control
This is the most important technical step:
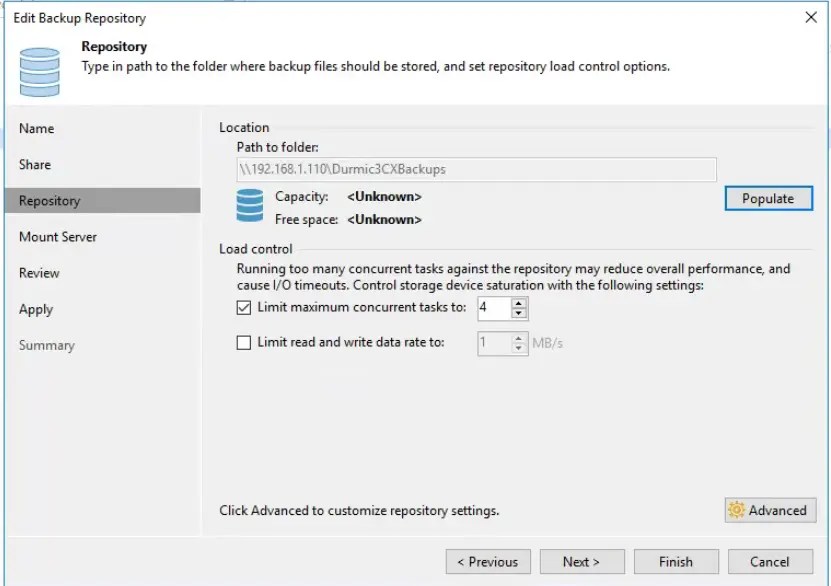
- Path to folder: Same UNC path defined in the Share step.
- Populate button: Click this to detect Capacity and Free Space.
- Load Control:
- Limit maximum concurrent tasks (example shows 4) — prevents overloading the storage.
- Limit read/write data rate (MB/s) — optional throttling.
Click Advanced for extra options like enabling Per-VM backup files, block alignment, and deduplication settings. Proper load control ensures stable performance and avoids I/O timeouts.
Mount Server Explained
The Mount Server step configures the server used for advanced restore operations:
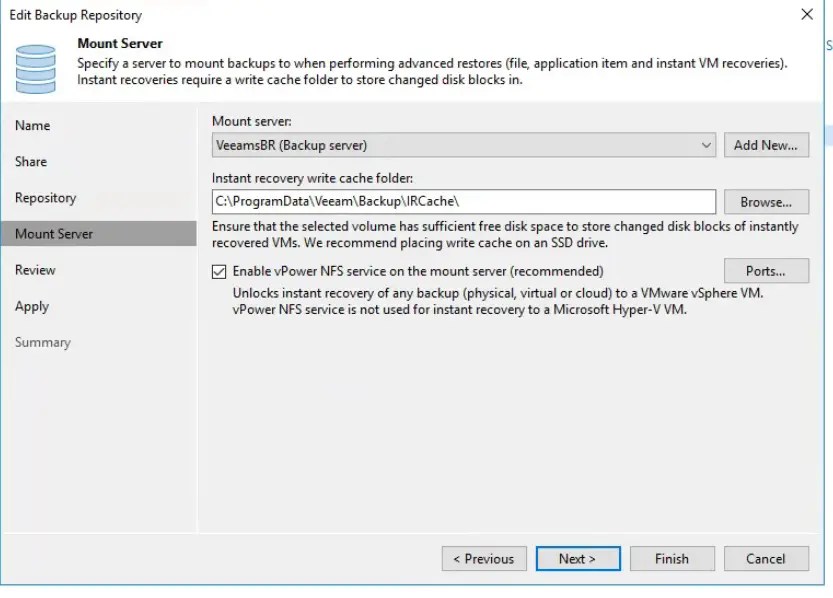
- Mount server: Usually the Veeam Backup Server (VeeamsBR).
- Instant Recovery write cache folder: Should be placed on a fast SSD (stores temporary changed blocks during Instant VM Recovery).
- Enable vPower NFS service: Strongly recommended for VMware environments. It enables quick Instant VM Recovery and file-level restores.
Purpose: The Mount Server virtually mounts backup files so you can perform granular restores (individual files, application items, databases, etc.) without restoring the entire VM.
Review
The Review page shows a summary of all settings before applying them. It lists components like Transport, vPower NFS, and Mount Server with their status.
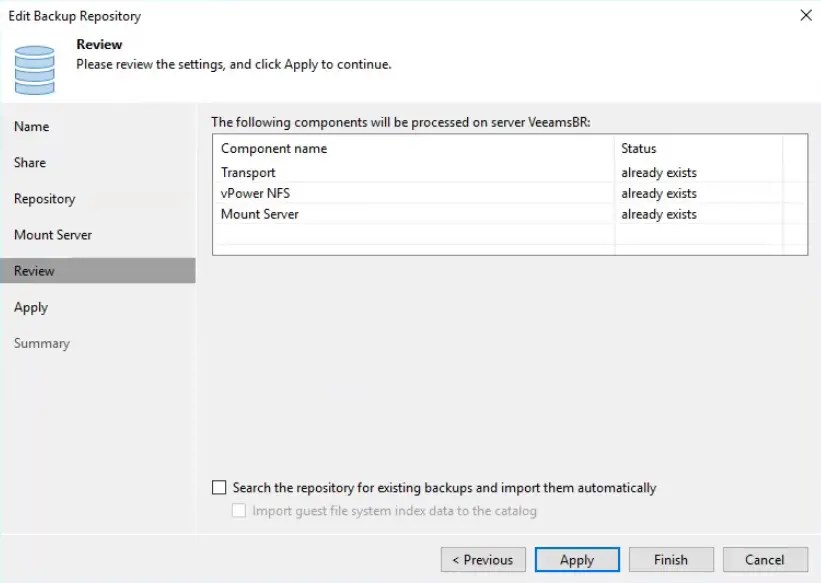
You can also enable:
- Search the repository for existing backups and import them automatically.
- Import guest file system index data.
This step helps catch any mistakes before finalizing.
Apply Step
Clicking Apply starts the actual configuration process. Veeam updates the infrastructure, registers the repository, and configures necessary services. This may take a few seconds to a few minutes.
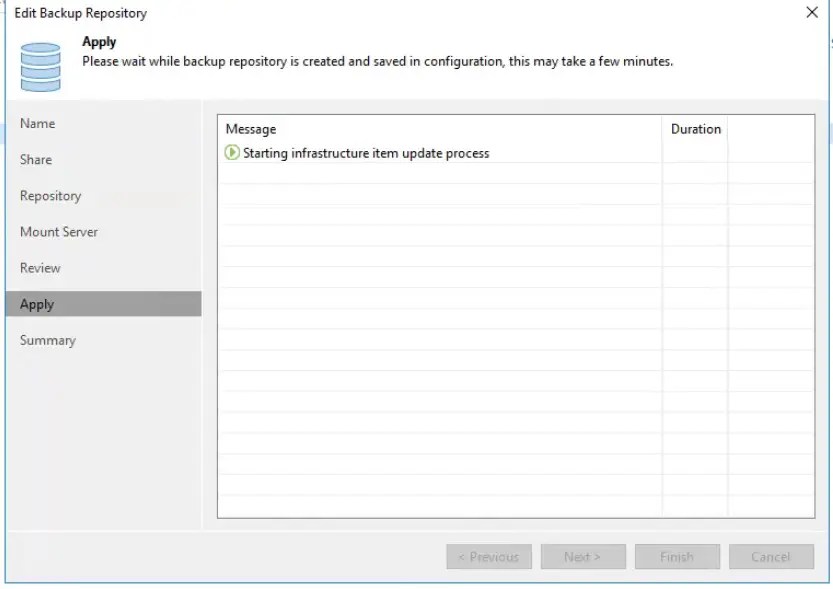
You will see messages like “Starting infrastructure item update process”.
Summary
The final Summary screen confirms successful configuration. It shows:
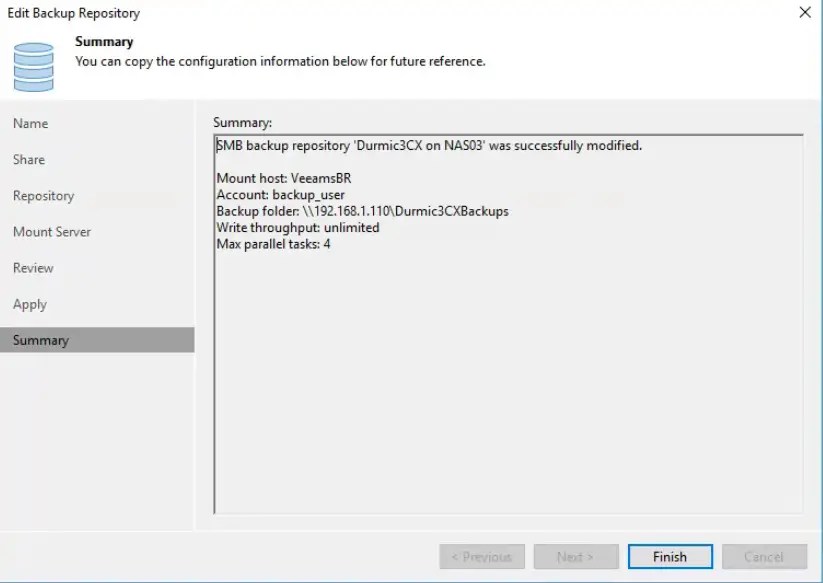
- Repository type and name
- Mount host
- Backup folder path
- Write throughput and Max parallel tasks
You can copy this information for documentation. Click Finish to complete the wizard.
How Veeam Backup Repository Works
A Veeam Backup Repository acts as the secure storage target for backup data. When a backup job runs, the Veeam Proxy server reads source data, applies compression and deduplication, and transfers it via the Veeam Data Mover service to the target repository.
The first backup creates a full backup (.VBK) file. Subsequent runs create incremental backups (.VIB) and metadata (.VBM) files. Veeam supports Forever Forward Incremental and Synthetic Full strategies to optimize storage and restore speed.
During restores, the Mount Server mounts the backup chain, allowing fast file-level, application-aware, and Instant VM Recovery. With Scale-Out Backup Repository (SOBR), multiple repositories can be combined into a single logical pool with performance and capacity tiers.
Hardened Linux Repositories add immutability to protect against ransomware — files cannot be deleted or modified during the retention period.
Advantages and Disadvantages Backup Repository
Advantages
- Highly flexible — supports Windows, SMB/NAS, Linux Hardened, Deduplication appliances, and Object Storage (S3, Azure Blob).
- Excellent built-in deduplication and compression for storage savings.
- Fast Instant VM Recovery and granular restores.
- Scale-Out capability for very large environments.
- Strong ransomware protection with immutability and encryption.
- Centralized management and monitoring.
Disadvantages
- Requires proper planning and sizing (especially concurrent tasks and storage performance).
- Network bandwidth can become a bottleneck with remote SMB shares.
- Advanced features have a learning curve.
- Higher licensing cost for very large deployments.
Comparison
- Veeam vs Rubrik: Veeam offers more flexibility and lower cost; Rubrik is simpler but more expensive.
- Veeam vs Commvault: Veeam is easier to use and faster to deploy; Commvault has more complex enterprise features.
- Veeam vs Nakivo / Acronis: Veeam provides superior Scale-Out, immutability, and enterprise-grade features.
- Veeam vs Native Cloud Backup (Azure/AWS): Veeam excels in hybrid environments with better control and granular recovery.
Veeam makes implementing the 3-2-1-1-0 backup rule much easier than competitors.
Step-by-Step Veeam Backup Repository Configuration Guide
Keywords: Veeam Backup Repository, How to Add Backup Repository in Veeam, Veeam SMB Repository Configuration, Veeam Mount Server Setup, Veeam Best Practices 2026
Prerequisites
- Veeam Backup & Replication (v11, v12, or v13) – Enterprise Plus recommended
- Target storage (NAS, Windows Server, or Linux) with sufficient space
- Backup user account with full read/write permissions
- Network connectivity and required firewall ports open (TCP 2500–2600+)
Prepare Infrastructure
Go to Backup Infrastructure > Managed Servers and add your Windows or Linux server if not already added.
Start the Wizard
Navigate to Backup Infrastructure > Backup Repositories > Add Repository.
Name & Description
Enter a clear name and optional description.
Share Configuration
- Enter the UNC path of the shared folder.
- Add credentials.
- Select Gateway Server for remote NAS.
Repository Settings
- Confirm the path.
- Click Populate to read storage capacity.
- Set Limit maximum concurrent tasks (start with 4–8 depending on storage performance).
- Configure Advanced settings (Per-VM backup files recommended).
Mount Server Configuration
- Select the mount server.
- Set write cache folder on fast SSD storage.
- Enable vPower NFS service.
Review
Double-check all settings.
Apply & Summary
Click Apply, wait for the process to complete, review the Summary, and click Finish.
Post-Configuration Best Practices
- Perform a manual Rescan after adding.
- Create a Scale-Out Backup Repository (SOBR) for better scalability.
- Use Hardened Linux Repository for immutable backups.
- Monitor repository health using Veeam ONE.
- Regularly test full restores.
- Optimize file system: ReFS on Windows or XFS on Linux with 64K block size.
Advanced Tips:
- Use Object Storage as Capacity Tier for long-term, cost-effective archiving.
- Apply Placement Policies in SOBR.
- Set immutability period (30–90 days recommended).
Common Troubleshooting:
- Capacity Unknown → Click Populate.
- Permission errors → Verify credentials.
- Slow performance → Reduce concurrent tasks.
- Mount issues → Check vPower NFS ports.
Real-World Example (Based on Your Screenshots) Your environment uses multiple SMB repositories on a NAS (192.168.1.110) for different workloads (3CX, Durmic, etc.). This segregation improves organization and policy management.
Conclusion
Configuring a Veeam Backup Repository is straightforward when following the correct steps. A well-configured repository delivers reliable, scalable, and secure backups that protect your critical data against ransomware and disasters.
This guide provides everything you need to successfully set up and manage Veeam Backup Repositories in 2026. For specific versions, NAS models (Synology, QNAP, TrueNAS), or SOBR setup, feel free to provide more details.
2 thoughts on “Veeam Backup Repository Setup and Configuration”