
How to Configure Hyper-V Replication Using Veeam
Introduction
Data protection and disaster recovery are critical for every IT infrastructure. Virtualization platforms like Microsoft Hyper‑V make workloads flexible, but they also demand reliable replication and backup strategies. This is where Veeam Backup & Replication comes in.
Veeam is a leading enterprise‑grade solution for backup, replication, and disaster recovery. It ensures that your virtual machines (VMs) remain available even if the primary site fails. In this article, we’ll walk through the entire process of configuring replication jobs in Veeam, using screenshots from a real setup. By the end, you’ll understand how to replicate servers step‑by‑step and why each configuration option matters.
What is Veeam Backup & Replication?
Veeam Backup & Replication is a data protection and disaster recovery tool designed for virtualized environments (Hyper‑V, VMware, and more).
Key Features:
- Backup: Creates restore points of VMs, applications, and files.
- Replication: Copies VMs to a secondary site for disaster recovery.
- Failover & Failback: Switch workloads to replicas during outages, then return to production later.
- WAN Acceleration: Optimizes replication over slow links.
- Application‑Aware Processing: Ensures consistent backups of applications like SQL Server or Exchange.
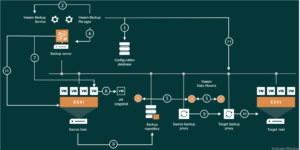
How It Works:
- Source VM → Veeam reads VM data from Hyper‑V host.
- Transport → Data is transferred via proxies (direct or WAN accelerated).
- Target VM → Replica is created on a disaster recovery host.
- Restore Points → Veeam maintains snapshots for rollback.
Where to Download:
You can download Veeam Backup & Replication directly from the official site:
- Veeam.com → Products → Backup & Replication (veeam.com in Bing)
Installation requires a Windows Server environment with adequate storage and network connectivity.
Step‑by‑Step Configuration of Replication Jobs
Below, we’ll go through each stage of setting up a replication job in Veeam. Each section corresponds to one of your screenshots.
Step 1: Replication Jobs Overview
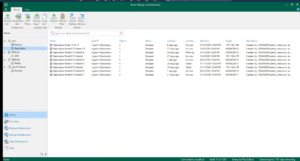
- Navigate to Jobs → Replication in the Veeam console.
- Here you’ll see all configured replication jobs.
- Columns show Name, Type, Objects, Status, Last Run, Last Result, Next Run, Target, Description.
- Jobs can be Stopped, Running, or Scheduled.
- This dashboard is your monitoring hub for replication health.
Step 2: Job Creation
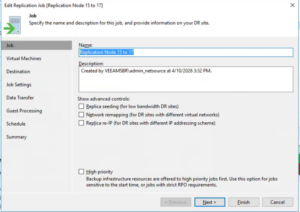
- When creating/editing a job, you define its Name and Description.
- Advanced options include:
- Replica Seeding: Useful for low bandwidth DR sites.
- Network Remapping: Adjusts networks between source and target.
- Replica Re‑IP: Changes IPs if DR site uses different addressing.
- High Priority: Ensures replication jobs get resources first.
This step sets the foundation of your replication job.
Step 3: Selecting Virtual Machines
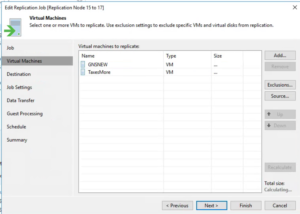
- Choose which VMs to replicate.
- You can add multiple VMs, exclude disks, or reorder them.
- Example: VM GNSNEW and TaxesMore selected.
- Veeam calculates total size automatically.
This ensures only critical workloads are replicated.
Step 4: Adding Objects
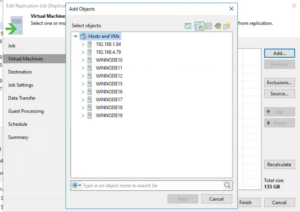
- Browse hosts and select VMs from your Hyper‑V cluster.
- Example: WINNODE10, WINNODE11, WINNODE15, etc.
- Total size is displayed (e.g., 135 GB).
- This step confirms which servers are included in replication.
Step 5: Destination Settings
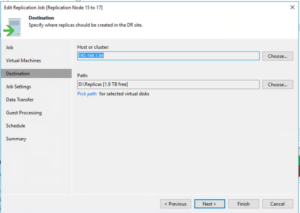
- Define the target host or cluster.
- Example: Host 192.168.1.84 with path D:\Replicas.
- Ensure sufficient free space is available.
- You can pick different paths for specific virtual disks.
This determines where replicas will reside in your DR site.
Step 6: Job Settings
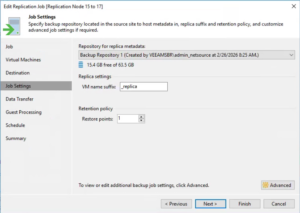
- Configure repository for replica metadata.
- Example: “Backup Repository 1” with 15.4 GB free.
- Define VM name suffix (e.g., _replica).
- Set restore points retention (e.g., 1).
- Advanced settings allow fine‑tuning.
This ensures replicas are properly tracked and managed.
Step 7: Data Transfer
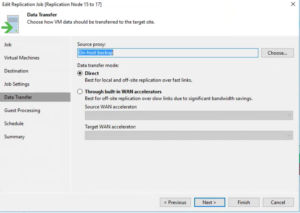
- Choose how VM data is transferred:
- Direct Mode: Best for local or fast links.
- WAN Accelerators: Best for slow links, saves bandwidth.
- Source proxy can be set to On‑host backup or custom proxy.
This step optimizes replication performance.
Step 8: Guest Processing
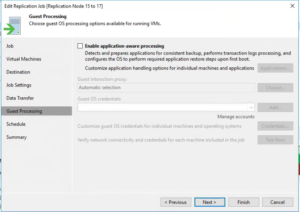
- Enable Application‑Aware Processing if needed.
- Ensures consistent backups for apps like SQL, Exchange.
- Configure Guest OS credentials.
- Test credentials to verify access.
This step is critical for application‑level recovery.
Step 9: Scheduling
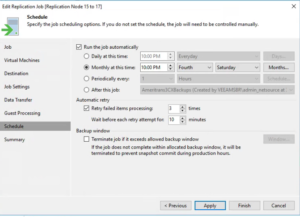
- Define when replication runs:
- Daily at 10:00 PM.
- Monthly on the fourth Saturday.
- Periodic every X hours.
- Configure automatic retries (e.g., 3 attempts, 10 min wait).
- Optionally set backup windows to avoid production impact.
This ensures replication jobs run automatically without manual intervention.
Step 10: Summary

- Review all settings:
- Job Name: Replication Node 15 to 17
- Source VMs: GNSNEW, TaxesMore
- Destination Host: 192.168.1.84
- Path: D:\Replicas
- Suffix: _replica
- Restore Points: 1
- Command line for job execution is displayed.
- Option to run job immediately after finishing.
Click Finish to save and activate the job.
Final Confirmation
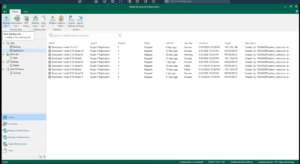
- Back in the Replication Jobs dashboard, you’ll see your new job listed.
- Status shows Stopped until scheduled run.
- Next Run column confirms upcoming execution time.
This proves replication has been successfully added for your servers.
Why Replication Matters
Replication is more than just copying data—it’s about business continuity.
- Disaster Recovery: If your primary site fails, replicas can be powered on instantly.
- Testing: Replicas can be used to test patches or upgrades without affecting production.
- Compliance: Many industries require off‑site redundancy.
- Peace of Mind: Knowing your workloads are safe reduces downtime risk.
Best Practices
- Plan Storage: Ensure DR site has enough capacity.
- Network Optimization: Use WAN accelerators for remote sites.
- Retention Policy: Keep enough restore points for rollback.
- Monitoring: Regularly check job results (Success, Warning, Failed).
- Failover Testing: Periodically test failover to confirm readiness.
Conclusion
Veeam Backup & Replication provides a powerful, flexible, and reliable solution for protecting virtualized workloads. By following the step‑by‑step process outlined above, you can configure replication jobs that safeguard your business against outages.
With replication in place, your Hyper‑V environment gains resilience, ensuring that critical applications remain available even during disasters.
This complete guide, along with screenshots, can serve as both a tutorial and a reference article for IT professionals setting up replication in their own environments.
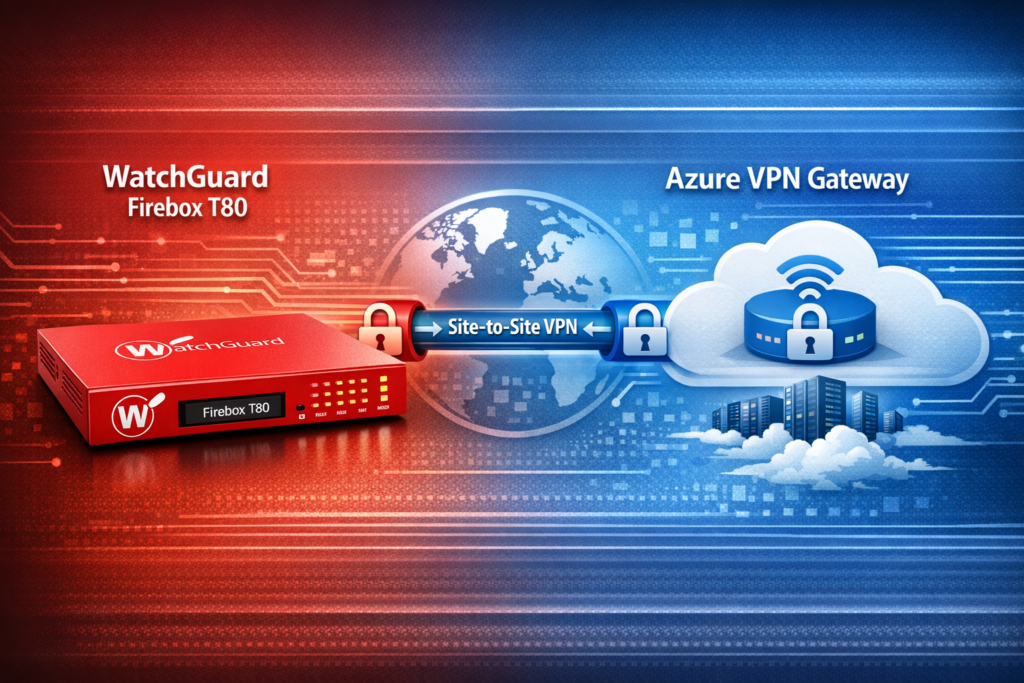
If you want to learn how to deploy a VPN Gateway in Azure, click the link below.
How to Deploy VPN Gateway in Azure

Pingback: AI Security Risks: BarracudaONE Cyber Resilience - novelspub.com
Pingback: Microsoft Hyper-V - Veeam Backup & Replication User Guide - novelspub.com
Pingback: Veeam Backup Repository Setup and Configuration - novelspub.com